Qortal Project

The future of blockchain platforms

User Tools

Site Tools


Qortal Project Wiki

Important Notices

Introduction

Project Model

Minting

Communications

Trade Portal

Qortal Hosting (QDN)

Voting System

AT System

Hardware

Frequently Asked Questions (FAQ)

How-To Guides

Node Setup Guides

Third-Party Services

how_to_setup_a_gateway_node

How to Setup A Gateway Node

(guide by crowetic)

Preparation

In order to prepare for setting up your own public gateway, you will need to have a server of some kind available. Ideally you'll want that server to have a static IP, but you can also setup things like 'Dynamic DNS (DDNS)' on systems that do not have a static IP. I will NOT be covering how to setup Dynamic DNS in this guide, but there are plenty of guides on how to setup DDNS.

For my gateway node (the one on qortal.link above) I used a Virtual Machine on one of my Hypervisors in a data center. I use this setup for any of my public servers and nodes, but that is not a requirement. Literally the only actual requirement is a node with internet access, so basically any node can work, as long as you can port forward internet ports in. (Ports 80 and 443 are the primary ports used by HTTP and HTTPS.) If you can forward those ports in, then you can turn your node into a public gateway.

For MY setup, I created a VM with 6GB of RAM and 4 CPU cores. The CPU on this Hypervisor is a XEON D-1541, but that is much more CPU than is required. Even a raspberry pi 4 with 4GB of RAM would work as a gateway. Literally any computer that can run Qortal, can be a gateway node.

Things to Remember

- Any computer that can run Qortal, CAN be a gateway node, however, in order to be a gateway node the machine needs public IP with port fowarding possible and unlimited or high cap on bandwidth is recommended, as since your node will be public that means anyone that accesses a QDN site through your node, will consume network data on the node's connection.

- Static IP is preferred - if you can't do a static IP, then DDNS is possible. (There are many guides on setting up DDNS)

- Your gateway node if setup following this guide will allow ANY QDN site to be accessed. This means that you, as the node operator, will need to pay attention if you don't want certain data to be on your node. Any data that gets accessed through your node will be on your node! Keep this in mind if you're concerned about this.

- There are ways to setup a gateway node for a specific QDN name only - that just requires changing settings on the node so that instead of allowing 'all' it allows only a single name. I will NOT be giving specific instructions for that in this guide, but it is possible to make a gateway for a single QDN name.

Node Setup

In this guide, I will be giving instructions for installation on Ubuntu 22.04 Server - Ubuntu Server is a headless OS and based on Debian Linux. Ubuntu server is what I use for basically all of my servers and my preferred OS for any hosting. You CAN set a gateway node up on other operating systems, but this guide will cover Ubuntu Server installation

This guide will cover the following options. I will give the reason for each option as well.

-Ubuntu Server - my personal favorite server OS (personal preference)

-nginx - nginx is a great web server software, we will utilize it as a reverse proxy for the Qortal Gateway.

-Cloudflare - Cloudflare is a DNS service provider that also provides a bunch of other solutions. I used cloudflare as a proxy in front of the gateway so that the backend server IP cannot be found, and I also used cloudflare for the SSL certificate - be aware, if you are going to follow this guide and you are NOT planning on using cloudflare, you will have to obtain an SSL certificate from another location - I will give some ideas for you on how to acquire a DIFFERENT cert, but will not be giving a walk-thru on the setup of the other cert, this guide is specifically going to be using Cloudflare to proxy and provide SSL, and nginx to reverse proxy to the Qortal node.

-Whichever Domain Name you plan to use… in this guide I will be using the qortal.link domain, as that is the one I have setup currently.

Qortal Configuration

Obviously in order to setup a QDN gateway, we will need a Qortal Node running. You can do the following to install Qortal and required software on a brand new Ubuntu Server installation.

 sudo apt update && sudo apt install default-jre unzip vim nginx 

Depending on which user you want to use for the Qortal node, you will create and super user to that user account

In my guide, I will create a user called 'qortal' for the qortal node.

 sudo adduser qortal
 sudo su - qortal 

From the Qortal user we will download and install the Qortal Core.

wget https://github.com/qortal/qortal/releases/latest/download/qortal.zip
unzip qortal.zip && rm qortal.zip
cd qortal && chmod +x *.sh

Once we've got the Qortal Core setup, we can modify the settings.json for Qortal, to get it ready for the gateway node.

nano settings.json

We will copy paste the following into the settings.json, and use cntrl+x then ENTER to save changes.

{{
  "gatewayEnabled": true,
  "gatewayPort": 8080,
  "maxPeers": 424,
  "maxNetworkThreadPoolSize": 1200,
  "repositoryConnectionPoolSize": 4620,
  "allowConnectionsWithOlderPeerVersions": false,
  "maxThreadsPerMessageType": [
        { "messageType": "ARBITRARY_DATA_FILE", "limit": 125 },
        { "messageType": "GET_ARBITRARY_DATA_FILE", "limit": 125 },
        { "messageType": "ARBITRARY_DATA", "limit": 125 },
        { "messageType": "GET_ARBITRARY_DATA", "limit": 125 },
        { "messageType": "ARBITRARY_DATA_FILE_LIST", "limit": 125 },
        { "messageType": "GET_ARBITRARY_DATA_FILE_LIST", "limit": 125 },
        { "messageType": "ARBITRARY_SIGNATURES", "limit": 125 },
        { "messageType": "ARBITRARY_METADATA", "limit": 125 },
        { "messageType": "GET_ARBITRARY_METADATA", "limit": 125 },
        { "messageType": "GET_TRANSACTION", "limit": 125 },
        { "messageType": "TRANSACTION_SIGNATURES", "limit": 125 },
        { "messageType": "TRADE_PRESENCES", "limit": 125 }
],
  "minPeerVersion": "4.4.0",
  "minOutbountPeers": 32,
  "blockCacheSize": 220,
  "apiRestricted": true,
  "listenAddress":"0.0.0.0",
  "apiWhitelistEnabled": false
}

As you can see, the maxPeers setting is VERY HIGH, on a Gateway Node, we WANT the maxPeers setting to be very high, as the more peers we have, the higher the likelihood of a connected peer having the data people are trying to access. Therefore, having 150 maxPeers will help with that.

Also, something to point out while we're in the process of setting up the Qortal node… This is specific to nodes with less than 8GB of RAM, such as my VM with 6GB.

On nodes with less than 8GB of RAM, we will want to modify the start.sh script so that the Java Virtual Machine (Qortal Core itself runs as a JVM) will utilize MORE RAM than the default setting.

I have created a modified start script that I have made available on my github and you can grab it like this…

rm start.sh
wget https://raw.githubusercontent.com/crowetic/QORTector-scripts/main/start-modified-memory-args.sh
chmod +x start.sh

That will modify the start script so that it uses 2000+MB of RAM total as opposed to the default which is 1/4 of system RAM. For systems with less than 8GB of RAM, making this change is essentially a requirement, or you may have issues with Qortal crashing due to low RAM.

Once we have done this we will go back to our sudo user so that we can do the configuration of nginx.

exit

NGINX Configuration

The exit command will take us back to our sudoer. Once we're there, we will modify the nginx config. The default location for the nginx configuration files is /etc/nginx/sites-enabled where individual site configuration files can be placed.

We will make a new configuration file for our gateway node.

cd /etc/nginx/sites-enabled
nano gatewaySSL

We will take the following configuration and copy paste it into the newly created file, then use cntrl+x and ENTER to save and close.

We will modify the following config to match whichever domain we are going to put our gateway node on. We will also modify the location of the cert file that we have not yet created on cloudflare, but we will. I generally put the certs in a folder called certs in the home folder of the qortal user. /home/qortal/certs is fine. That is what the settings file below has configured by default.

Make sure to select ALL of the information in the following code block, or your configuration will fail

server {
    listen 80 default_server;
    server_name _;

    return 301 https://$host$request_uri;
}

server {
   listen 443 ssl;
   
####REPLACE THE FOLLOWING WITH YOUR DOMAIN AND CERTIFICATE FILE LOCATIONS###

   server_name qortal.link; 
   ssl_certificate  /home/qortal/certs/cloudflarecert.pem;
   ssl_certificate_key  /home/qortal/certs/cloudflarecert.key;
   ssl_prefer_server_ciphers on;

   location / {
   
####REPLACE THE FOLLOWING WITH YOUR SERVER'S LAN IP - This is a requirement at the moment due to the way the Qortal Gateway mode works, so if your server does NOT have a LAN IP, it will require a slightly different configuration. My VM runs on its own virtual LAN, with its own firewall, so my server has a LAN IP... but some VMs do not, I have not setup a gateway on machines that do not, so I cannot tell you exactly how to do it. Generally for a 'proxy_pass' setup, you would use 127.0.0.1, but due to the way Qortal functions, that doesn't work as intended right now. That may change in the future, but right now a LAN IP here is a requirement.####

#### You will set the port here to whichever port you configured in the Qortal Settings.json - ours is configured to port 8080.
   
        proxy_pass http://10.0.22.22:8080;

        proxy_set_header        Host $host;
        proxy_set_header        X-Real-IP $remote_addr;
        proxy_set_header        X-Forwarded-For $proxy_add_x_forwarded_for;
        proxy_set_header        X-Forwarded-Proto $scheme;
   }
}

That's it. cntrl+x to save and ENTER to exit, now everything we need is configured, other than SSL.

Confguring Cloudflare

In order to use cloudflare SSL and the cloudflare proxy we will need to ensure our domain is controlled by Cloudflare DNS. In order to do this, we will need to set cloudflare as our DNS provider for the domain.

To do this, there are plenty of tutorials, but it's fairly simple.

-Create CloudFlare account - https://cloudflare.com

-Tell CloudFlare the name of your domain

-Import your domain to CloudFlare, you will need to modify the DNS records on your existing DNS provider, to change the nameservers to CloudFlare.

-If you REGISTERED your domain with CloudFlare, then you can skip this step.

I personally use namecheap.com for REGISTERING my domains, so I needed to port the DNS over to CloudFlare before I could use CloudFlare's services. However, CloudFlare also allows registering new domains so if you do THAT, then your DNS will be controlled by CloudFlare by default, and you'll be fine.

Once your DNS is controlled by cloudflare, you will need to change a few settings and create your 'origin certificate' on CloudFlare, for your SSL.

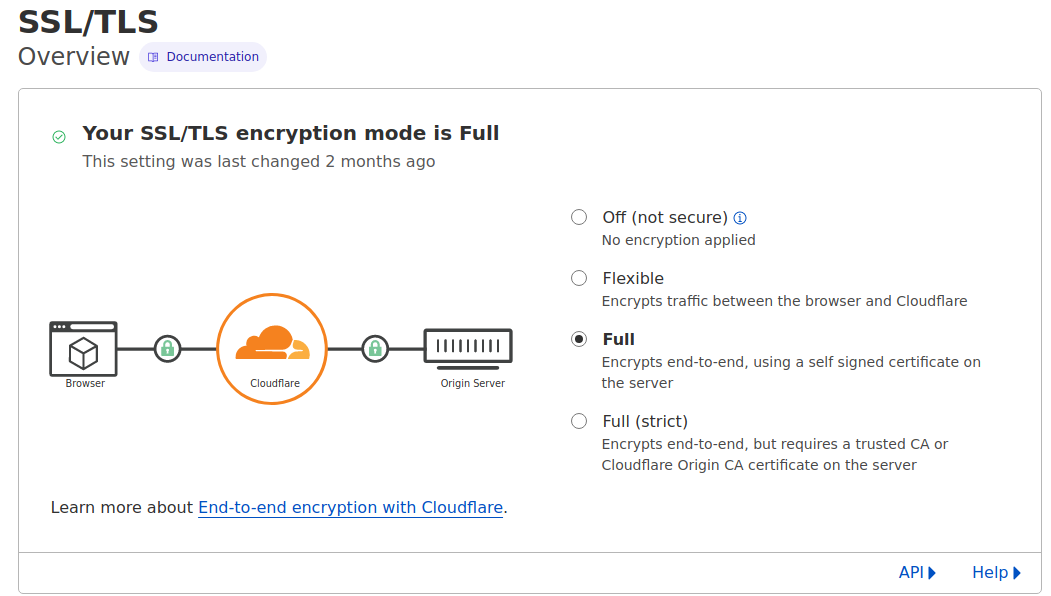
First, set SSL to FULL mode, so that your origin cert will work as intended.


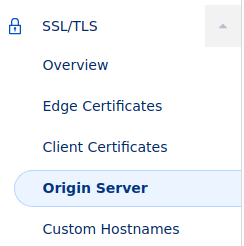
Then, go to the origin server settings under SSL settings.

Click CREATE CERTIFICATE - During this stage, you will also want to get back into your qortal user on your server to get ready to save the SSL certificates.

Cloudflare will show you your SSL certificates in TEXT format, you will copy and paste them into files

Back on your SSH window do this…

sudo su - qortal
mkdir certs
cd certs

When CloudFlare shows you the CERT, you will do the following, and copy paste it into the following file

 nano cloudflarecert.pem

Again use cntrl+x then ENTER to save and exit, you will then have the file /home/qortal/certs/cloudflarecert.pem which is what nginx will use for your cert file based on the settings above.

When CloudFlare shows you the KEY, you will do the following, and copy paste it into the following file

 nano cloudflarecert.key

Same here, after copy/pasting, use cntrl+x and ENTER to save, and you will have the new file /home/qortal/certs/cloudflarecert.key file that nginx will use for your certificate KEY file.

DNS Configuration

In your Newly setup CloudFlare DNS, you will create a new A Record with the public IP of your server (you can get the public IP of the server like this…) curl canhazip.com

You will create the new A record in your DNS settings in CloudFlare, and input that IP.

You will make sure the CloudFlare Proxy (the little cloud icon) is ON or your SSL and CloudFlare's ability to hide your server's public IP address will NOT function correctly. Cloudflare only works with its origin certs, if their proxy is enabled.

Once you have done that, you're officially ready, and your domain will reply to your node.

Finishing Up

Alright, now that we've configured Qortal, CloudFlare with SSL, and nginx, we should be good to go! We only have a few things left. Let's start Qortal and restart nginx first, then we will ensure our ports are forwarded correctly.

The first thing you'll do, is start Qortal. Since you're still in your qortal user on your server, you can simply do this…

 cd && cd qortal && ./start.sh

Then Qortal will start. It will take a while to bootstrap and get fully started.

Once that has happened, you can exit back to your sudoer account, and restart nginx.

exit
sudo service nginx restart

Now you should be golden. Only thing left is to make sure you have the correct ports forwarded in to your node.

Forwarding the Correct Ports

Your Gateway Node needs to use the following ports on TCP protocol, the specifics of the forwarding will depend on how your firewall is setup, which type of firewall you have, etc… this guide does not cover port forwarding, but there is another guide on this wiki that does, and there are plenty of other guides specific to whichever router and firewall you're using. The necessary ports are:

-Port 80 - port 80 is used for redirection from http to https through your nginx config. When a user inputs yourdomain.whatever, by default, the browser will send them to port 80, when they get there, your nginx config will bounce them to port 443 and secure them with SSL.

-Port 443 - port 443 is used for SSL connections. SSL is an encrypted connection to the node, so that the traffic isn't sent in plain text. In reality, QDN does not NEED SSL, but when connecting through a gateway from the traditional internet it's a good idea.

-Port 12392 - port 12392 is the Qortal P2P port - in order to get as many connections as possible for your maxPeers setting, and to allow as easy access to data on your node as possible, having this port forwarded will be VERY helpful.

-Port 12391 (optional) - port 12391 is the Qortal API port - this port is used for DIRECT connection by the OWNER (you) of the node, with the direct public IP address (not the DNS through cloudflare, that will NOT work as described below…) for configuration of the blocked websites and so forth. If you think you'll need to block sites with data that doesn't work for your location, etc… having this port open, and your UI configured to connect to the public IP of your gateway node, is a good idea, so you can use your UI to make those types of changes directly.

Final Words

The benefits of a Gateway Node are numerous, however, they NEED to be setup in a similar fashion to the way this one is, or there could be potential issues. Using the gateway node, a user can acquire another peer for their data simply by viewing through your public gateway, this allows users with nodes that are not online all the time, to acquire another peer that is.

Gateway nodes also allow people who do not have a Qortal Node installed to access QDN hosted content, this is quite nice for demoing the functionality and showing what QDN can accomplish, as well as what QDN hosted websites look like when not viewed through the Qortal UI.

However, there ARE some potential NEGATIVES as well… such as the fact that the content viewed through a gateway node is not sandboxed like the content is when viewed directly through the UI. This means that links to the internet WILL work, etc… it could also open potential attack vectors, so people should be aware of that. it is no less secure than the traditional internet, but just not nearly as secure as accessing sites directly through the UI.

Also, When Q-Apps get launched, if the Q-App requires a user account in order to function, accessing through a Gateway, will NOT allow that to take place (at least not YET.) Having a user account authentication requires using the UI at the moment, as there is no such thing right now as a 'browser plugin' for Qortal Authentication. That MAY be a thing in the future, but as of right now it is not.

Gateway nodes are mostly for demo purposes, or allowing access to QDN-hosted content to people who are NOT running a Qortal node.

Also, be aware in certain locations certain content is 'restricted' this may cause issues with your gateway if your server is in a jurisdiction with strict 'laws' on data, so you will need to pay CLOSE attention to which data is on QDN, and if a piece of data that could cause problems in your location comes around, you can BLOCK that content on your gateway. The easiest way to block content on your gateway, would be to setup your gateway node to allow connections on port 12391 then configure your UI to connect directly to the IP address of your node. (Note - if you have your node setup like it is in this guide, you will NOT be able to use your node's domain name to access any ports other than the 80 and 443 web ports. This is because CloudFlare only proxies the main web ports. So you will have to use the direct public IP address for connectivity from the UI. THAT'S IT! Hopefully this guide is helpful to those looking to setup a Qortal Gateway Node**… I put as much detail as I could here so that it would be understandable, whether people use the exact setup I did or not.

Another thing to note - 'certbot' by 'letsencrypt' is another option for SSL, you CAN use that, you just need to create the certs after pointing your A record to your node's IP.

However, if you do NOT use cloudflare, your server's backend IP address will be able to be found by nslookup command. This also has a benefit, however, if you DO set your node up this way, you CAN connect to it by way of the domain name, as there won't be a CloudFlare proxy in front of it.

You CAN still use CloudFlare for your DNS with or without using CloudFlare's proxy and origin certificate, but if you DO want to use letsencrypt, you'll need to either modify the CloudFlare proxy settings, or remove the proxy by going to your DNS settings and removing the little cloud icon.

By default, CloudFlare applies its proxy, but you CAN tell it to bypass it.

Anyway, I will do more guides on other semi-complex topics as time goes on. Hope you enjoy this one!

how_to_setup_a_gateway_node.txt · Last modified: 01/17/2024 16:23 by crowetic